Cinnamon Frontend
This sections contains concepts for developing the Angular frontend.
Setting up the development environment
Cinnamon Platform
- Install Java 17
- Install the latest PostgreSQL. Tested versions are: 16
- Download Tomcat 10
- Download Tomcat 10 Core from here: https://tomcat.apache.org/download-10
- Unzip the file and move the folder to your preferred destination
- Checkout Cinnamon
- Set up the database. Execute the script
cinnamon-platform/src/main/resources/db/db_create.sqlas user postgres - Add run configuration to your IDE
- IntelliJ
- Create a new configuration for a
LocalTomcat Server - Select the previous installed Tomcat 10 server as the
Application server. You might have to add the server by clicking theConfigure...button.Tomcat HomeandTomcat base directoryshould point to the extracted directory. - (Optional) Add
-Dspring.profiles.active=devto yourVM options. This enables the development profile and allows to run other modules with Docker (for example with the provided docker-compose.yml). - Select your
JRE - Under the
DeploymentTab add the artifactcinnamon-platform:.war exploded. TheApplication contextmust be the root, otherwise Angular will not be able to communicate with the backend.
- Create a new configuration for a
- IntelliJ Community
- Install the plugin
Smart Tomcat - Select the previous installed Tomcat 10 server as the
Tomcat server. You might have to add the server by clicking theConfigure...button. - (Optional) Add
-Dspring.profiles.active=devto yourVM options. This enables the development profile and allows to run other modules with Docker (for example with the provided docker-compose.yml).
- Install the plugin
- IntelliJ
- (Optional) Install Docker for running other modules
Cinnamon Frontend
- Install Node (Supported versions can be found here: https://angular.dev/reference/versions )
- Checkout Cinnamon
- Install dependencies. Navigate to the directory
cinnamon-platform/cinnamon-frontendand runnpm install - Add run configuration to your IDE
- IntelliJ
- Create a new
npmconfiguration - Select the
package.jsonat<project path>\cinnamon-platform\cinnamon-frontend\package.json - Set
Commandtorun - Set
Scriptstong - Set
Argumentstoserve - (Optional) Create a
JavaScript Debugconfiguration and set URL tohttp://localhost:4200
- Create a new
- IntelliJ Community
- Create a new
Shell Scriptconfiguration - Select
Script text - Set
Script texttong serve - Set the working directory to
<project path>/cinnamon-platform/cinnamon-frontend - Check
Execute in the terminal
- Create a new
- IntelliJ
Project Structure
The application’s code is located in the src/app/ directory. The entry point of the application is index.html, which currently only adds the root component <app-root> under src/app/app.component.*. The root module app.module.ts adds all the necessary modules and defines global providers.
The application is structured into several sub-directories, including core, shared, features, assets, and styles. The rules for each of these directories can be found in the ABOUT files. They describe what kind of files should be located in the directory.
The core directory contains files that only need to be loaded once, such as root-scoped services, static components (navbar / footer), interceptors, etc.
The shared directory contains everything that should be lazy-loaded and is used by multiple other components. Components here should not have dependencies on anything else.
The features directory is used to structure the components based on specific features. Every feature subdirectory contains pages, components, services, models, etc. that are specific to the feature.
The assets directory contains all static resources for a webpage. PathLocationStrategies can help make files easily available.
The styling directory contains global stylesheets.
Usage of Environments
This projects uses environments located in src/environments for setting up the development environment.
The dev environment is automatically loaded when running the frontend locally with ng serve.
This will replace the regular environments.ts with the environment-dev.ts during the build.
Currently, only the backend URL is set.
This file can be imported like any other typescript file in other components. For example in a service class the import statement would look like this:
import { environments } from "../../../environments/environment";Application Layout
The layout of the application is built in the root module app.component.html.
The navigation is located on the left and handles different page configurations through an object (steps.ts).
The title is located on top and is handled by TitleService so that every shown view can set its own title.
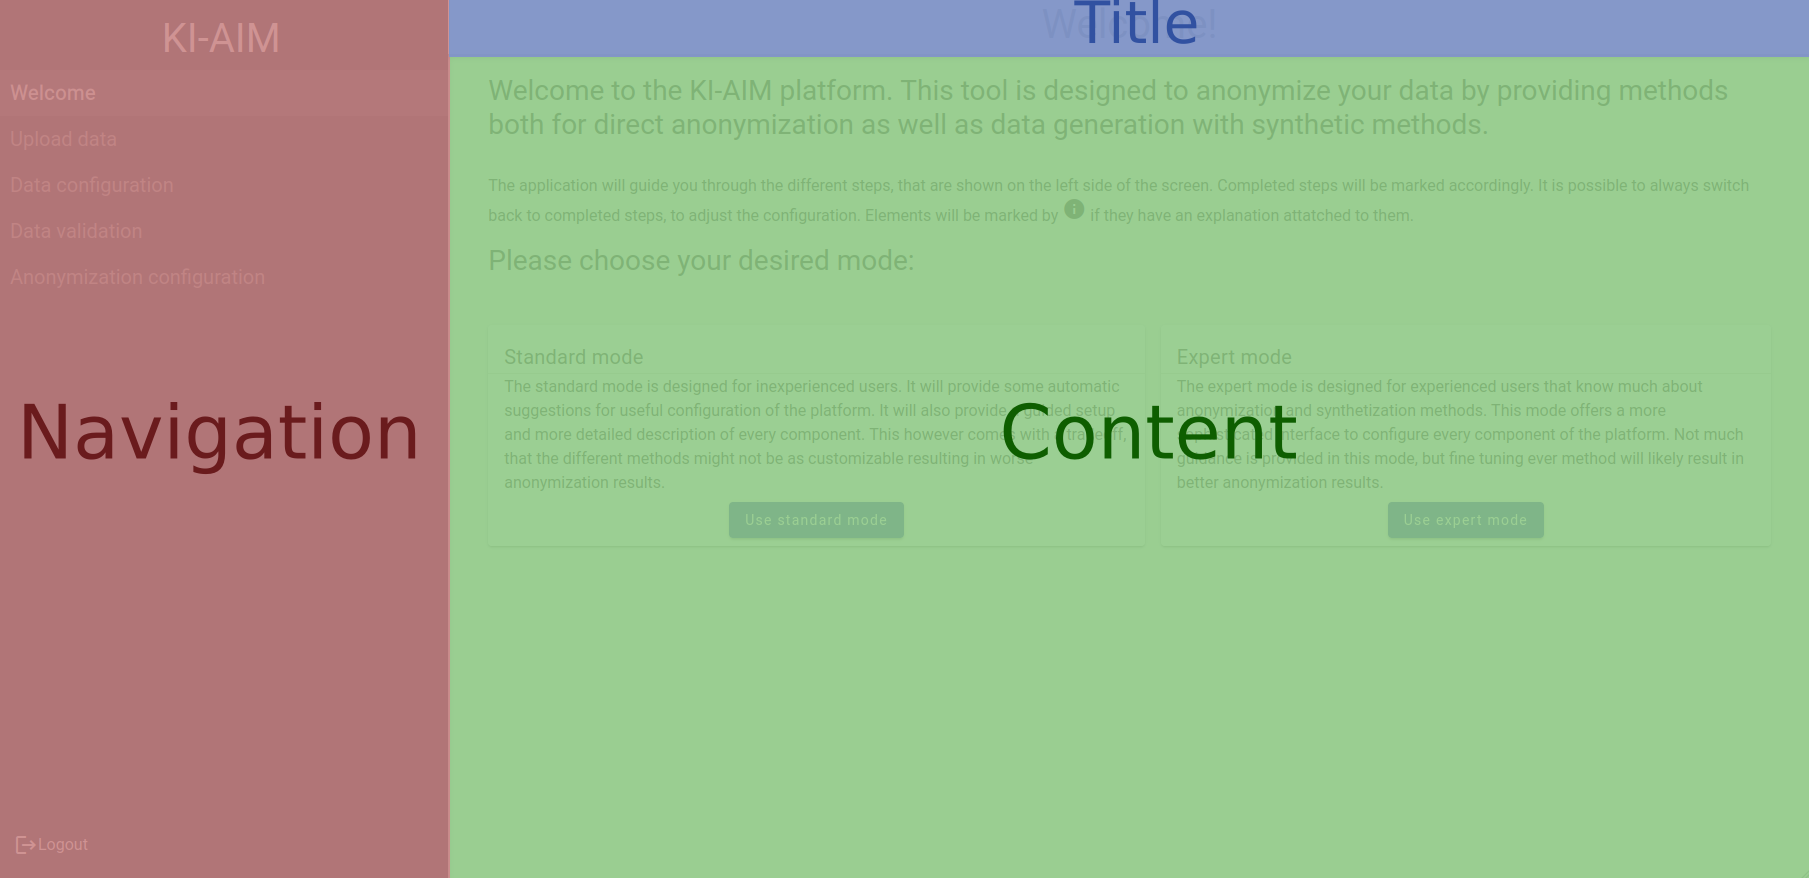
The central view is changed by the router component depending on the URL. The router links the view components to a specific URL (from app-routing.module.ts):
The AuthGuard ensures that only authenticated users can access these pages and redirects to the login page if the user is not logged in.
// app-routing.module.ts
const routes: Routes = [
    {path: '', redirectTo: 'login', pathMatch: 'full'},
    {path: 'login' , component: LoginComponent},
    {path: 'register', component: RegisterComponent},
    {path: 'start', component: StartpageComponent, canActivate: [AuthGuard]},
    {path: 'upload', component: UploadFileComponent, canActivate: [AuthGuard]},
    {path: 'dataConfiguration', component: DataConfigurationComponent, canActivate: [AuthGuard]},
    {path: 'dataValidation', component: DataValidationComponent, canActivate: [AuthGuard]},
    {path: 'anonymizationConfiguration', component: AnonymizationConfigurationComponent, canActivate: [AuthGuard]},
    {path: 'synthetizationConfiguration', component: SynthetizationConfigurationComponent, canActivate: [AuthGuard]},
    {path: 'execution', component: ExecutionComponent, canActivate: [AuthGuard]},
    {path: 'technicalEvaluationConfiguration', component: TechnicalEvaluationConfigurationComponent, canActivate: [AuthGuard]},
    {path: 'riskEvaluationConfiguration', component: RiskAssessmentConfigurationComponent, canActivate: [AuthGuard]},
    {path: 'evaluation', component: EvaluationComponent, canActivate: [AuthGuard]},
];
The StateManagementService manages as the name suggests the state of the current project.
By injecting the service into the constructor in app.component.ts the StateManagementService gets initialized when reloading the page and fetches the state of the project from the backend.
This can also be done manually by calling the provided methods, for example after the user logged in.
Communication between Front- and Backend
Model Classes
Data models are plain classes that only store information and located in src/app/shared/model.
They should be identical to the corresponding backend model/JSON from the backend.
When annotating fields of model classes with @Type or @Transform, the entire class hierarchy is transformed when using Angular’s HttpClient or when calling the plainToInstance method.
This allows for example the usage of instanceof.
In order to prevent a big number of files, related classes can be put into the same file.
Here is an example of a data model:
// statistics.ts
export class Statistics {
    @Type(() => ResemblanceStatistics)
    resemblance: ResemblanceStatistics;

    @Type(() => UtilityStatistics)
    utility: UtilityStatistics;
}
Sending Data
Communication is done via Angular’s HttpClient.
Doing this allows the easy conversion between the type safe data classes and the JSON strings that are transferred between the Front- and Backend.
This is used in several different components of the application. An example can be found in upload-file.component.html in line 37:
<!-- upload-file.component.html -->
<div class="py-2">
    <button mat-raised-button color="primary" (click)="uploadFile()" [disabled]="!this.dataFile">Confirm file and
        start configuration
    </button>
</div>
Here the uploadFile() function is called (from upload-file.component.ts):
// upload-file.component.ts
uploadFile() {
    this.loadingService.setLoadingStatus(true);

     if (!this.dataFile) {
         return;
     }

     this.fileService.uploadFile(this.dataFile, this.fileConfiguration).subscribe({
         next: value => {
            // ...
         },
         error: err => {
            // ...
         },
     });
}
This function uses a service class (FileService - file.service.ts) that provides an Observable object from a HTTPClient in its uploadFile function:
// file.service.ts
public uploadFile(file: File, fileConfiguration: FileConfiguration): Observable<FileInformation> {
    const formData = new FormData();

    formData.append("file", file);
    const fileConfigString = JSON.stringify(fileConfiguration);
    formData.append("fileConfiguration", fileConfigString);

    return this.httpClient.post<FileInformation>(this.baseUrl, formData).pipe(tap(value => {
        this._fileInfo = value;
    }));
}
By doing this we can perform asynchronous requests that do not freeze the application. If we need to prevent user input during this time we need to manually freeze the application e.g. with the already implemented loading screen:
//enable
this.loadingService.setLoadingStatus(true);
//disable
this.loadingService.setLoadingStatus(false);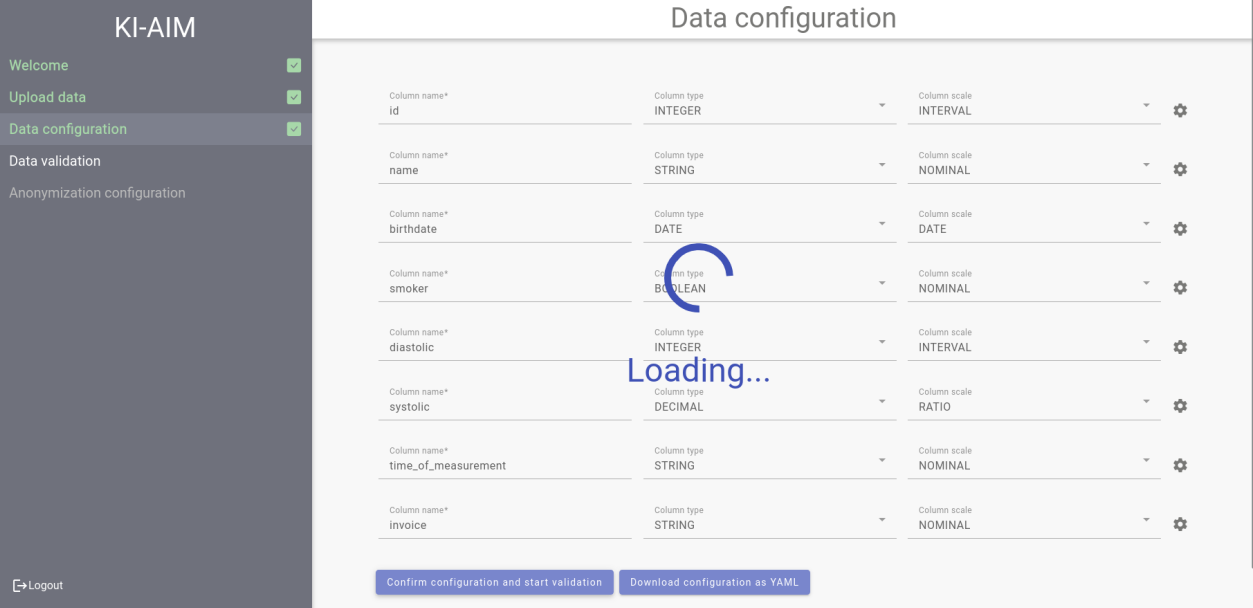
Fetching Data
When fetching data from the backend, utilizing code patterns can reduce the number of HTTP calls. Using naive approaches can result into duplicate requests, for example if data from the backend is used in different components. Additionally, data stored in components is lost when an instance of the component gets destroyed, for example when switching to another step. This would trigger another request when creating the component again at a later time. In order to prevent fetching the same data multiple times, specific service patterns can be used.
If the required data never changes, the following pattern as used in the AppConfigService can be used.
// app-config.service.ts
export class AppConfigService {
    private readonly baseURL = environments.apiUrl;

    private _appConfig: AppConfig| null = null;
    private _appConfig$: Observable<AppConfig> | null = null;

    constructor(
        private readonly http: HttpClient,
    ) {
    }

    public get appConfig$(): Observable<AppConfig> {
        if (this._appConfig) {
            return of(this._appConfig);
        }
        if (this._appConfig$) {
            return this._appConfig$;
        }

        const ac = this.http.get<AppConfig>(this.baseURL + "/config.json").pipe(
            tap(value => {
                this._appConfig = value;
            }),
            share(),
            finalize(() => {
                this._appConfig$ = null;
            }),
        );

        this._appConfig$ = ac;

        return ac;
    }
}
The result of the request gets cached in the service and can be reused.
Ongoing requests are stored as observables, which can be used multiple times because of the shared() method inside the pipe() method.
Appending a $ character to variable names is a common convention to mark Observables
The appConfig$ is used for example in the AppComponent.
// app.component.ts
export class AppComponent implements OnInit {
    protected appConfig$: Observable<AppConfig>;

    constructor(
        private readonly appConfigService: AppConfigService,
    ) {
    }

    public ngOnInit(): void {
        this.appConfig$ = this.appConfigService.appConfig$;
    }
}
This Observable then can be used in the HTML template.
Angular provides a async pipeline which simplifies the usage and automatically subscribes to the Observable when needed and unsubscribes after the component gets destroyed.
Directly using the appConfig$ from the AppConfigService would result in an endless loop, so it is important to store the Observable as a member inside the component.
<!-- app.component.html -->
<ng-container *ngIf="appConfig$ | async as appConfig">
</ng-container>
If the data changes over time, the data can be invalidated by setting the values back to null.
For automatic synchronization with the backend, a pattern like in the ProjectConfigurationService can be used.
// project-configuration.service.ts
export class ProjectConfigurationService {
    private _projectSettings$: Observable<ProjectSettings> | null = null;
    private projectSettingsSubject: BehaviorSubject<ProjectSettings> | null = null;

    constructor(
        private readonly http: HttpClient,
    ) {
    }

    private initializeProjectSettings(): void {
        if (!this.projectSettingsSubject) {
            this.projectSettingsSubject = new BehaviorSubject<ProjectSettings>(new ProjectSettings());
            this._projectSettings$ = this.fetchProjectSettings().pipe(
                // ...
                tap(value => {
                    this.projectSettingsSubject?.next(value);
                }),
                shareReplay(1),
            );
        }
    }

    public get projectSettings$(): Observable<ProjectSettings> {
        this.initializeProjectSettings();
        return this._projectSettings$!;
    }

    public setProjectSettings(value: ProjectSettings): Observable<void> {
        this.projectSettingsSubject!.next(value);
        return this.putProjectSettings(value);
    }
}
Instead of storing the value directly as a member, it is encapsulated inside a BehaviorSubject, which can emit newer values over time.
When subscribing to observables manually instead of using Angular’s async pipe, it is good practice to unsubscribe from the observable when the component gets destroyed.
// data-configuration.component.ts
export class DataConfigurationComponent implements OnInit, OnDestroy {
    private dataConfigurationSubscription: Subscription;

    ngOnInit(): void {
        this.isFileTypeXLSX$ = this.fileService.fileInfo$.pipe(
            map(value => {
               return value.type === FileType.XLSX;
            })
        );

        this.dataConfigurationSubscription = this.configuration.dataConfiguration$.subscribe(value => {
            // ...
        });
    }

    ngOnDestroy() {
        this.dataConfigurationSubscription.unsubscribe();
    }
}
Adding new Features
Adding new views
Every new view should also be a part of a feature.
Every feature can have multiple different views that are necessary to complete a feature.
If helpful, features can also be split into multiple sub-features (e.g. feature_a & feature_b).
In general, as every view is a component, the view can also be associated with logic.
However this logic should read from the view or change the view in some way.
Every action that is not dependent on the view itself should be moved to a service class.
Handling data persistence between views
There are two different ways that data persistence is handled in the current state of the platform. The first possibility is already described in Communication between Front- and Backend. That means that in order to persist data, it is sent to the backend and saved in the database. A separate endpoint in the backend needs to be existent for this to work.
The other possibility involves the creation of simple data classes in the frontend. Their sole purpose is to store different attributes and offer getter and setter methods.
Additionally we can use Angular providers to establish the level for which the data should be persisted: A provider on module level is added in said module:
// data-upload.module.ts
@NgModule({
	declarations: [
		//declarations
	],
	imports: [
		//imports
	],
	exports: [
		//exports
	],
	providers: [
		FileService
		//providers
	],
})
export class DataUploadModule {}
As you can see, inside the data upload module - the module definition for the data upload feature - the FileService is registered as a provider. That means everytime the module is imported and used, a new instance for the file service is created. Between all files inside the module this single instance is automatically injected by defining it in a constructor of a component:
// upload-file.component.ts
export class UploadFileComponent {
	// class attributes

	constructor(
		//Additional constructor parameters
		private fileService: FileService,
		//Additional constructor parameters
	) {
			//Constructor
	}
}
To achieve the same on the root application level, the provider has to be registered in the root module.
Working with Angular Forms
Generally, there are two type of forms in Angular: Reactive forms and Template-driven forms.
Reactive forms are specified by a FormGroup object bound to the inputs by using formGroup and formControl directives inside the HTML template.
Template-driven forms on the other hand need an underlying object for defining the structure and use [(ngModel)] directives for binding.
Cinnamon mostly uses reactive forms, for example in all of the configuration pages.
In template-driven forms, validation can be performed with already existing or custom validation directives.
For validating reactive forms, the validation functions have to be added to the FormControl object.
Custom validators like appNoSpaceValidator can be created by implementing a ValidatorFn for reactive forms or by implementing the Validator interface for template-driven forms.
// no-space-validator.directive.ts
export function noSpaceValidator(): ValidatorFn {
    return (control: AbstractControl): ValidationErrors | null => {
      return (typeof control.value === 'string') && control.value.trim().includes(" ")
        ? { noSpace: { value: control.value } }
        : null
    }
}

@Directive({
    selector: '[appNoSpaceValidator]',
    providers: [
        {
            provide: NG_VALIDATORS,
            useExisting: NoSpaceValidatorDirective,
            multi: true,
        }
    ],
    standalone: false
})
export class NoSpaceValidatorDirective implements Validator {

  constructor() { }

  validate(control: AbstractControl<any, any>): ValidationErrors | null {
    return noSpaceValidator()(control);
  }
}
Managing and synchronizing configurations
Managing generic configurations can be done by using the ConfigurationsService.
This service provides utility to import/export configurations and for automatic synchronization with the backend.
In order to use the ConfigurationService, the configuration has to be registered beforehand by calling the registerConfiguration(data: ConfigurationRegisterData) function with a configured ConfigurationRegisterData object.
The details are described in the documentation of the fields.
The configurations can be registered at application start by using the provider in the module declaration.
Below is an example from the DataUploadModule.
// data-upload.module.ts
@NgModule({
    // ...
    providers: [
        // ...
		provideAppInitializer(() => {
            const initializerFn = ((service: DataConfigurationService) => function () { return service.registerConfig(); })(inject(DataConfigurationService));
            return initializerFn();
        }),
    ],
})
export class DataUploadModule {}
A registered configuration gets fetched when the page is loaded.
For this the constructor of app.component.ts is used to initialize the StateManagementService which triggers the request.
When exporting or importing a configuration, the configuration gets pushed to the backend.
Working with configuration pages
The ConfigurationPage component and the AlgorithmService together provide the utility to display a form based on a given configuration definition.
Each step that uses this utility should have its own module.
See the Synthetization as an example.
A minimal setup requires a module containing a component that includes the ConfigurationPage component and a service that extends the AlgorithmService.
The module declaration and the service are used to register the configuration as shown in the previous section.
Additionally, five functions have to be implemented in the service.
// algorithm.service.ts
export abstract class AlgorithmService {

    /**
     * Name of the step. Must be equal to the name in Spring's application.properties.
     */
    abstract getStepName(): string;

    /**
     * Name of the configuration.
     * TODO(DPM) fetch from backend
     */
    abstract getConfigurationName(): string;

    /**
     * Name of the stage the configured job belongs to.
     */
    abstract getExecStepName(): string;

    /**
     * Name of the jobs to be configured by this configuration page.
     */
    abstract getJobs(): string[];

    /**
     * Creates the YAML configuration object sent to the backend as well as to the external module.
     * @param arg The configuration from the form.
     * @param selectedAlgorithm The selected algorithm.
     */
    abstract createConfiguration(arg: Object, selectedAlgorithm: Algorithm): Object;

    /**
     * Extracts the form data and the algorithm name from the given configuration object.
     * @param arg The configuration object.
     * @param configurationName The key of the configuration.
     */
    abstract readConfiguration(arg: Object, configurationName: string): { config: Object, selectedAlgorithm: Algorithm };

    // ...
}
The component is simple and requires two things.
Inside the HTML the ConfigurationPage has to be included as follows.
<app-configuration-page></app-configuration-page>In the component’s declarations, an implementation of the algorithm service has to be provided.
// synthetization-configuration.component.ts
@Component({
    // ...
    providers: [
        {
            provide: AlgorithmService,
            useExisting: SynthetizationService
        },
    ]
})
export class SynthetizationConfigurationComponent {
    // ...
}
The ConfigurationPage automatically injects the provided service.
// synthetization-configuration.component.ts
export class ConfigurationPageComponent implements OnInit {
    // ...
    constructor(
        protected readonly algorithmService: AlgorithmService,
        // ...
    ) {
    }

    // ...
}
Internal workflow
The page fetches the step configuration from the API using the step name defined inside the algorithm service implementation. Then the available algorithms are fetched and displayed in the selection input. When selecting an algorithm, the definition is fetched and the form is created dynamically by using “dynamic reactive forms” . For that, the form object and the corresponding HTML form are created with a matching structure.
Initial values of inputs should be set when creating the form object. Changing the values afterwards will trigger change events which may lead to unexpected behaviour during the initialization phase.
Adding new input types
New form elements can be added by creating a new switch case inside configuration-input.component.html.
For this, a new value of ConfigurationInputType should be created.
In special cases, the function setToDefault() inside configuration-input.component.ts has to be adapted as well.
New validations can be added by modifying the createForm method inside configuration-form.component.ts and by adding new <mat-error> elements to the input in configuration-input.component.html.
Complex components can also be put into their own component.
Working with execution pages
Execution pages have been abstracted similar to the configuration pages.
The service ExecutionStepService has to be implemented for each execution page by implementing two methods.
// execution-step.service.ts
export abstract class ExecutionStepService {
    /**
     * Name of the step. Must be equal to the name of the step in the backend.
     */
    protected abstract getStageName(): string;

    /**
     * Corresponding step of the execution page.
     * @protected
     */
    protected abstract getStep(): Steps;
}
A component similar to the ConfigurationPageComponent does not exist for execution pages because of the differences when displaying results of processes.
Instead the existing components execution.component.ts and evaluation.component.ts can be used as templates when developing new execution pages.
Styling conventions
Upon creation, every components creates its own stylesheet and links it to the class definition.
If a styling should be limited to only the component and should not be applied to anything else these stylesheets should be used.
For more general styling the global stylesheets in src/app/styles/.. should be used.
Examples for such styling could be layout specific rules, colors, reappearing elements (that are not the component itself), etc.
Currently these are rules for viewsizes, the general layout, some reusable variables, colors and icons.
Additionally all stylesheets use .less.
In order to apply rules to the angular material components, src/app/styles/angular-material.scss has to be used, as the specific settings can only be overwritten with .scss stylesheets.
Usage of Angular Material components
In general the Angular material documentation is a good place to look for examples on how to use the components.
The Angular material components have to be used in a unique way and work differently from normal froms that were created with bootstrap. Most of the time the Angular material components have their own selector, some of them are used as a directive:
Example for Input field from attribute-configuration.component.ts:
<!-- attribute-configuration.component.html -->
<mat-form-field>
    <mat-label>Column name</mat-label>
    <input type="text" matInput [id]="'name_' + attrNumber" (blur)="trimValue('name');" formControlName="name"/>
    <mat-error *ngIf="columnConfigurationForm.controls['name'].hasError('noSpace')">Name must not contain spaces</mat-error>
    <mat-error *ngIf="columnConfigurationForm.controls['name'].hasError('required')">Name must not be blank</mat-error>
    <mat-error *ngIf="columnConfigurationForm.controls['name'].hasError('unique')">Name must be unique</mat-error>
</mat-form-field>
Both examples can be seen in the shown code snippet.
Form inputs have to be included in a <mat-form-field> element.
A normal input element is enriched by the matInput directive to transform it to an Angular material input.
The angular directives can be used like they normally would.
For specific Angular material elements it can be useful to create custom components with dynamic text that reduces the amount of code everytime the element is used.
This has been done for the info-card.component.html and the information-dialog.component.html